Install NexCMP
The installer is a single script served by your license server. It checks the machine, activates your license, downloads and verifies the program, installs the services and (optionally) sets up nginx with a Let's Encrypt certificate.
Before you start
- A server that meets the requirements, and root access.
- Your license key and main domain from your license page — see License and purchase.
- A DNS record for the domain — see DNS and Cloudflare. You can also install first and fix DNS later; the installer tells you what is missing and can simply be run again.
Install
- Log in to the server and become root (or prefix with
sudo). - Run the command from your license page. It looks like this:
bash
curl -fsSL https://nexcmp.com/install.sh | sudo bash -s -- \
  --license NXC-XXXXX-XXXXX-XXXXX-XXXXX \
  --domain cloud.example.com \
--email admin@example.com- Wait for the checkmarks. A fresh install takes a few minutes; the first start creates the database schema and can take up to a minute on slow disks.
- Read the summary at the end. It prints the portal and admin URLs, the setup code, and the next step.
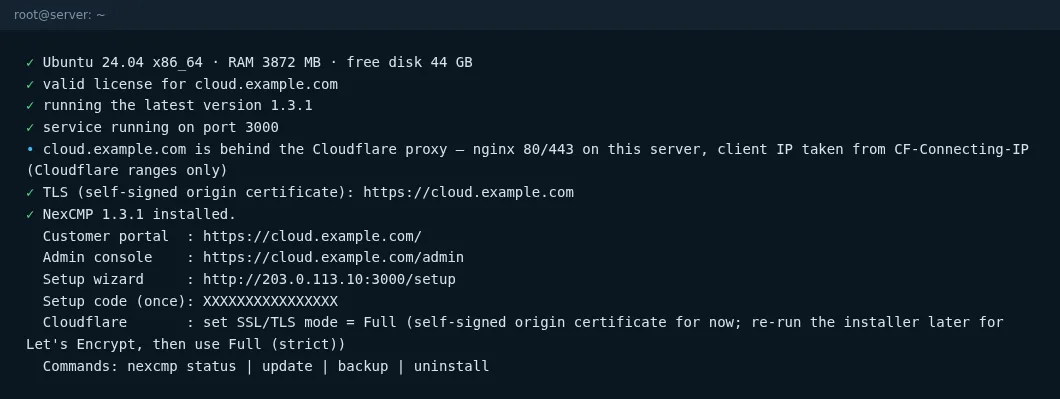
Parameters
| Parameter | Default | Meaning |
|---|---|---|
--license KEY | required on first install | The license key. |
--domain NAME | required on first install | Main domain. Must match the license. https:// and trailing paths are stripped. |
--email ADDRESS | none | Contact e-mail for Let's Encrypt expiry notices. Without it the certificate is registered without e-mail. |
--port N | 3000 | Local port of the panel (1–65535). |
--no-nginx | off | Do not install or configure nginx / TLS. Use this when you run your own reverse proxy or want to look at NexCMP first. |
--behind-cloudflare | auto-detected | Force "the domain is proxied by Cloudflare" mode. Normally detected from DNS. |
--channel NAME | stable | Release channel. |
Running the installer again without parameters reuses the saved ones (/etc/nexcmp/install.conf) and upgrades safely, keeping data, configuration and accounts. That is exactly what sudo nexcmp update does.
What the installer does
- Checks the machine — Ubuntu 22.04/24.04, x86_64, at least 2 GB RAM, 8 GB free disk.
- Installs packages it needs (
curl,zstd,openssl,python3,openssh-client…). - Creates the service user
nexcmpand the directories:/opt/nexcmp(program, owned by root, read-only to the service),/etc/nexcmp(configuration),/var/lib/nexcmp(data),/var/log/nexcmp. - Activates the license for the domain and stores a fixed instance ID for this machine.
- Downloads the newest release you are entitled to, then verifies its SHA-256 and its Ed25519 signature. A release without a valid signature is refused. It never downgrades a newer running version.
- Writes configuration and systemd units (
nexcmp,nexcmp-vmd,nexcmp-update) and starts the services; it waits for/healthzto answer. - Sets up nginx and TLS (unless
--no-nginx): obtains a Let's Encrypt certificate with certbot (webroot challenge) for the domain and foradmin.<domain>/partner.<domain>when those names also resolve. If DNS does not point to this server (or Cloudflare) yet, it skips this step and says so. - Prints a summary with URLs and, if no administrator exists yet, the setup code.
The panel port (3000)
- During first install the panel listens on
0.0.0.0:3000so you can open the setup wizard athttp://<server-IP>:3000/setup. - Once the wizard is finished and TLS is active, the panel listens on
127.0.0.1only; nginx proxieshttps://<domain>to it. - For emergencies (nginx broken, DNS wrong) you can open the port for a limited time:
sudo nexcmp open-port 30(30 minutes, then it closes itself) — or use an SSH tunnel:ssh -L 3000:127.0.0.1:3000 <server>and browsehttp://127.0.0.1:3000/.
Plain HTTP
Port 3000 is plain HTTP. Use it only for the setup wizard on a trusted network, or through an SSH tunnel. Do not leave it open.
Installing without a public domain (lab or test)
You can install on a machine with no DNS yet:
bash
curl -fsSL https://nexcmp.com/install.sh | sudo bash -s -- \
  --license NXC-XXXXX-XXXXX-XXXXX-XXXXX --domain lab.example.com --no-nginx
Then open the wizard through an SSH tunnel (ssh -L 3000:127.0.0.1:3000 <server>, browse http://127.0.0.1:3000/setup). Re-run the installer without --no-nginx once DNS exists.
Docker and Kubernetes
There is no published container image. The installer (a native systemd installation) is the supported installation method.
Verify
bash
sudo nexcmp statusYou should see the version, nexcmp: active, nexcmp-vmd: active, healthz: ok, and — until the wizard is done — the setup code. Continue with the setup wizard.
If something fails, see Installation errors.