Proxmox VE
Where in the admin: Infrastructure › Cloud provider › Providers (
/infra/providers), then the provider page (/infra/providers/<id>) with the tabs Overview, Clusters, VMs, Servers and Credentials. Plans are set under Services › Virtual Machines › Plans & pricing (/vm/catalog).
What it does
NexCMP can sell virtual machines that run on one or more Proxmox VE clusters, next to or instead of CloudStack. A VM is created by cloning an OS template with full clone, then configured through cloud-init: size, IP address from a pool you define, root password and SSH key. Customers get power control, console, snapshots, reinstall, password reset and metrics in the portal. They never see the cluster, node or source name.
Use it when you already run Proxmox VE, or to offer a second, differently priced pool of VMs.
Requirements
| Item | Requirement |
|---|---|
| Proxmox VE | PVE 9.x. The integration was verified on 9.2. It needs the import storage content and import-from disk option (PVE 8.2 or newer). |
| Network from the panel | HTTPS to the cluster API, https://<host or IP>:8006. No path, user name or query. The panel and the worker both connect; the browser console is proxied through the panel. |
| Account | A dedicated PVE user with an API token and a custom role with the privileges listed below. Never use root@pam. |
| Storage | A storage for VM disks that supports clones (for example local-lvm). For the built-in template builder, the storage named local with the content types import and snippets. |
| Network | A Linux bridge (for example vmbr0) that reaches the network where customer IPs live. Use a VLAN-aware bridge if you enter a VLAN tag. |
| IPs | An IPv4 block (/16 to /30) routed to that bridge, with a gateway. NexCMP assigns addresses itself; Proxmox has no IP management. |
| Templates | One cloud-init template VM per OS, on every node you deploy to, with the QEMU guest agent. |
| Zone | An existing zone to attach the cluster to. See Zones. |
| Depends on | Nothing. |
Prepare the infrastructure
Run the commands as root on any cluster node.
1. Create a least-privilege role, user and API token
Create the role. The privilege list is exactly what NexCMP uses; it contains nothing that edits users, storage definitions or the datacenter.
bashpveum role add NexCMP -privs "VM.Allocate VM.Clone VM.Config.CDROM VM.Config.CPU VM.Config.Cloudinit VM.Config.Disk VM.Config.HWType VM.Config.Memory VM.Config.Network VM.Config.Options VM.PowerMgmt VM.Audit VM.Console VM.Snapshot VM.Snapshot.Rollback VM.Backup VM.GuestAgent.Audit VM.GuestAgent.Unrestricted Datastore.Audit Datastore.AllocateSpace Datastore.AllocateTemplate Sys.Audit Sys.AccessNetwork SDN.Use SDN.Audit Pool.Audit Mapping.Audit Mapping.Use"Sys.AccessNetworkis required by the cloud-image download. PVE 9 has noVM.Monitorprivilege; do not add it.Create the user and a token.
--privsep 1means the token's rights are the intersection of the user's and the token's own permissions.bashpveum user add nexcmp@pve --comment "NexCMP" pveum user token add nexcmp@pve api --privsep 1The command prints the token secret once (a UUID). Copy it now. The token id is
nexcmp@pve!api.Give the role to both the user and the token. This is the step people miss: with privilege separation only the token gets 403 errors such as
Datastore.Auditif the user has no permission.bashpveum acl modify / --roles NexCMP --users nexcmp@pve pveum acl modify / --roles NexCMP --tokens 'nexcmp@pve!api'Test it from the panel server:
bashcurl -sk -H 'Authorization: PVEAPIToken=nexcmp@pve!api=<secret>' https://192.0.2.10:8006/api2/json/versionA JSON document with a
versionmeans the token works. (-kis only for this quick check; NexCMP pins the certificate itself, see below.)
2. Check the bridge and the storage
bash
pvesm status          # storages, type, content and free space
ip -br link show type bridge- Customer VMs get
virtionetwork interfaces on the bridge you enter in NexCMP. If you set a VLAN, the bridge must be VLAN-aware. - Put customer VMs on a bridge or VLAN separate from the node's management address. If they share a network, the Proxmox firewall's automatic management IP set opens ports 22, 8006, 3128, 5900-5999 and 60000-60050 of the node to every VM in that network. If you cannot separate them, add an explicit DROP rule for the VM subnet to those ports above the management ACCEPT rule.
3. Storage notes (LVM-thin)
- Leave thin-pool zeroing at its default. Turning it off (
lvchange -Zn) can leave old data in newly allocated chunks and corrupt the partition tables or file systems of cloned VMs. - Disks that report "write cache: disabled" can clone at only a few MB/s. Check with
hdparm -W /dev/sdXand enable the write cache if the disk has power-loss protection.
4. Enable the import content (only for the built-in template builder)
The built-in builder downloads the cloud image into the storage named local and creates the template from it. Add import (and snippets) to that storage's content list. Keep the types you already use; --content replaces the whole list:
bash
pvesm status --storage local     # note the current content
pvesm set local --content iso,vztmpl,backup,import,snippets
5. Build an OS template from a cloud image
A template is a cloud-init VM that NexCMP clones. Each one is registered under a short OS key such as ubuntu-24.04 with its VM id. Build one template per OS on every node that will receive VMs, because the clone runs on the chosen node.
Option A, recommended: build it yourself. Stock Ubuntu and Debian cloud images do not contain the guest agent and do not allow root login, and NexCMP sets the root password through cloud-init. Prepare the image first:
bash
apt install -y libguestfs-tools
wget -O noble.qcow2 https://cloud-images.ubuntu.com/noble/current/noble-server-cloudimg-amd64.img
virt-customize -a noble.qcow2 --install qemu-guest-agent \
  --write /etc/cloud/cloud.cfg.d/99-nexcmp.cfg:$'ssh_pwauth: true\ndisable_root: false\n' \
  --write /etc/ssh/sshd_config.d/00-nexcmp.conf:$'PermitRootLogin yes\nPasswordAuthentication yes\n'
Then create the template VM (id 9000 is an example; keep template ids below the vmid from value, default 1000):
bash
qm create 9000 --name tpl-ubuntu-24-04 --memory 2048 --cores 2 --cpu host --ostype l26 \
  --scsihw virtio-scsi-single --net0 virtio,bridge=vmbr0 --agent 1 --serial0 socket --vga serial0
qm set 9000 --scsi0 local-lvm:0,import-from=$PWD/noble.qcow2,discard=on,iothread=1
qm set 9000 --ide2 local-lvm:cloudinit --boot order=scsi0
qm template 9000
Option B: the built-in builder. The Create OS template from cloud image card on the Clusters tab (see below) downloads a qcow2 image, builds the template and registers it. It creates the VM with cloud-init and the guest agent flag, but it does not change what is inside the image. Use it only with an image that already allows root login and runs the guest agent, or when you also provide a cloud-init vendor-data snippet.
The guest agent is needed for Reset password and for showing the VM's IP address.
6. Know the certificate fingerprint (optional)
NexCMP trusts the cluster by pinning the SHA-256 fingerprint of its TLS certificate, so a self-signed certificate is fine. To see the value NexCMP will pin:
bash
openssl x509 -in /etc/pve/local/pve-ssl.pem -noout -fingerprint -sha256Connect in NexCMP
Open Infrastructure › Cloud provider › Providers and click Add cloud provider. Choose Proxmox VE and fill in:
Field Example value Name Proxmox cluster 1Endpoint https://192.0.2.10:8006Token id nexcmp@pve!apiToken secret XXXX(the UUID printed in step 1)Slug pve-1(a-z, 0-9, hyphen, 2-32 characters)Default node pve1(empty: the online node with the most free RAM)Storage local-lvmBridge vmbr0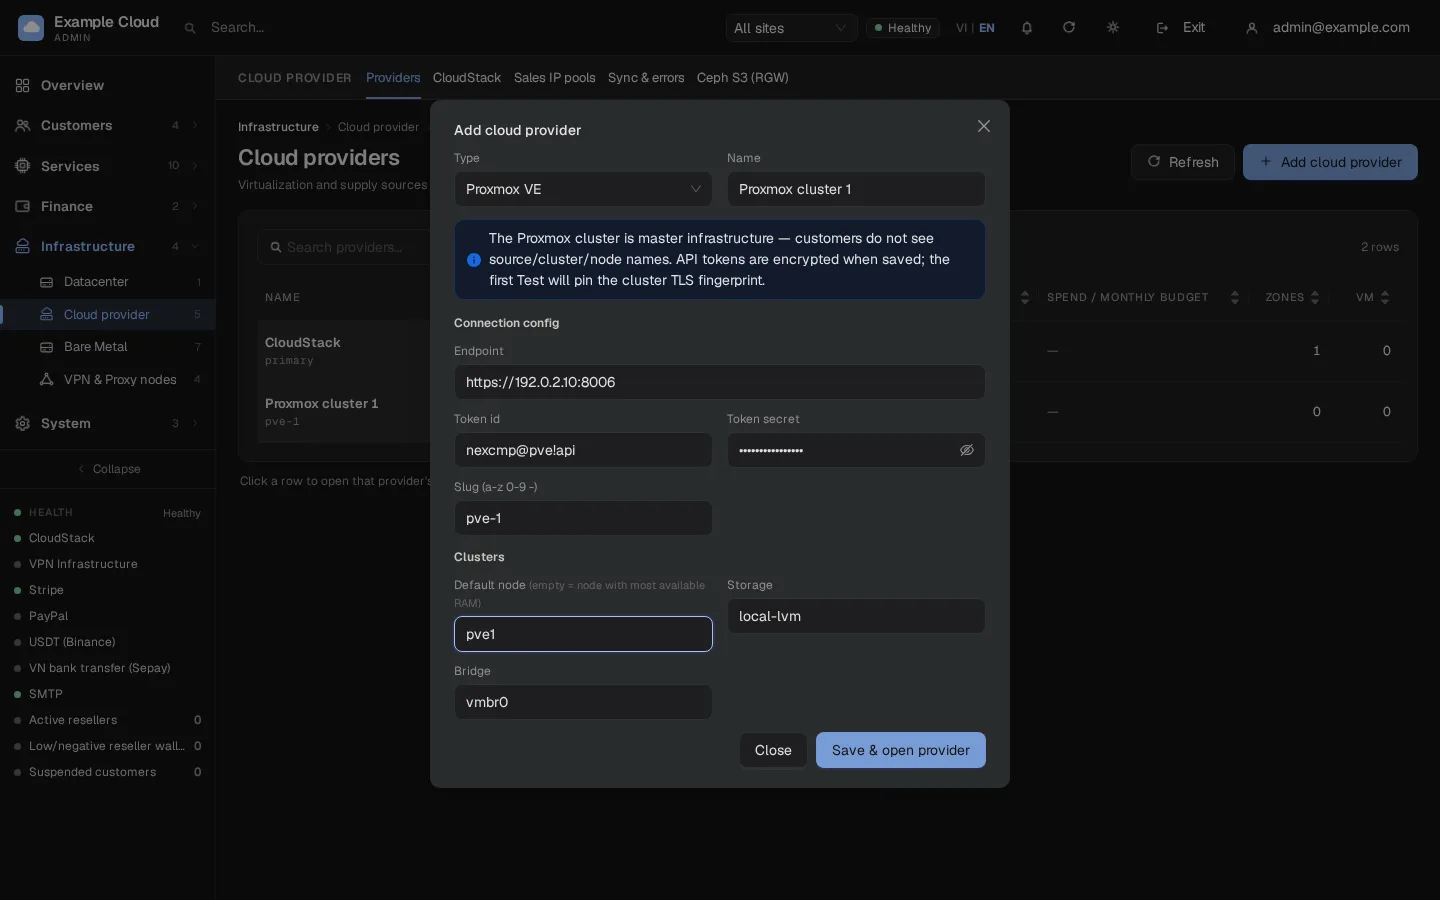
Click Save & open provider, enter a reason when asked. The token is encrypted before it is stored.
On the Overview tab click Test connection. The first successful test pins the cluster's TLS fingerprint; from then on a different certificate is refused.
Open the Clusters tab. The card Node · storage · bridge lists what the API sees; the card Cluster configuration holds the settings:
Field Meaning Default node Node used for new VMs. Empty means the online node with the most free RAM. Storage, Bridge, VLAN Disk storage, NIC bridge and optional VLAN tag (0 means none). CPU type hostby default. Usex86-64-v2-AESwhen the nodes have different CPU generations.vmid from First VM id given to customer VMs (default 1000). Storage ISO, Storage backup Leave empty unless you use them; empty means the ISO and backup features are not offered. Template OS One per line, os-key=vmid, for exampleubuntu-24.04=9000.Pinned TLS fingerprint (SHA-256) Filled in by the first test. Clear it and test again after you replace the cluster certificate. 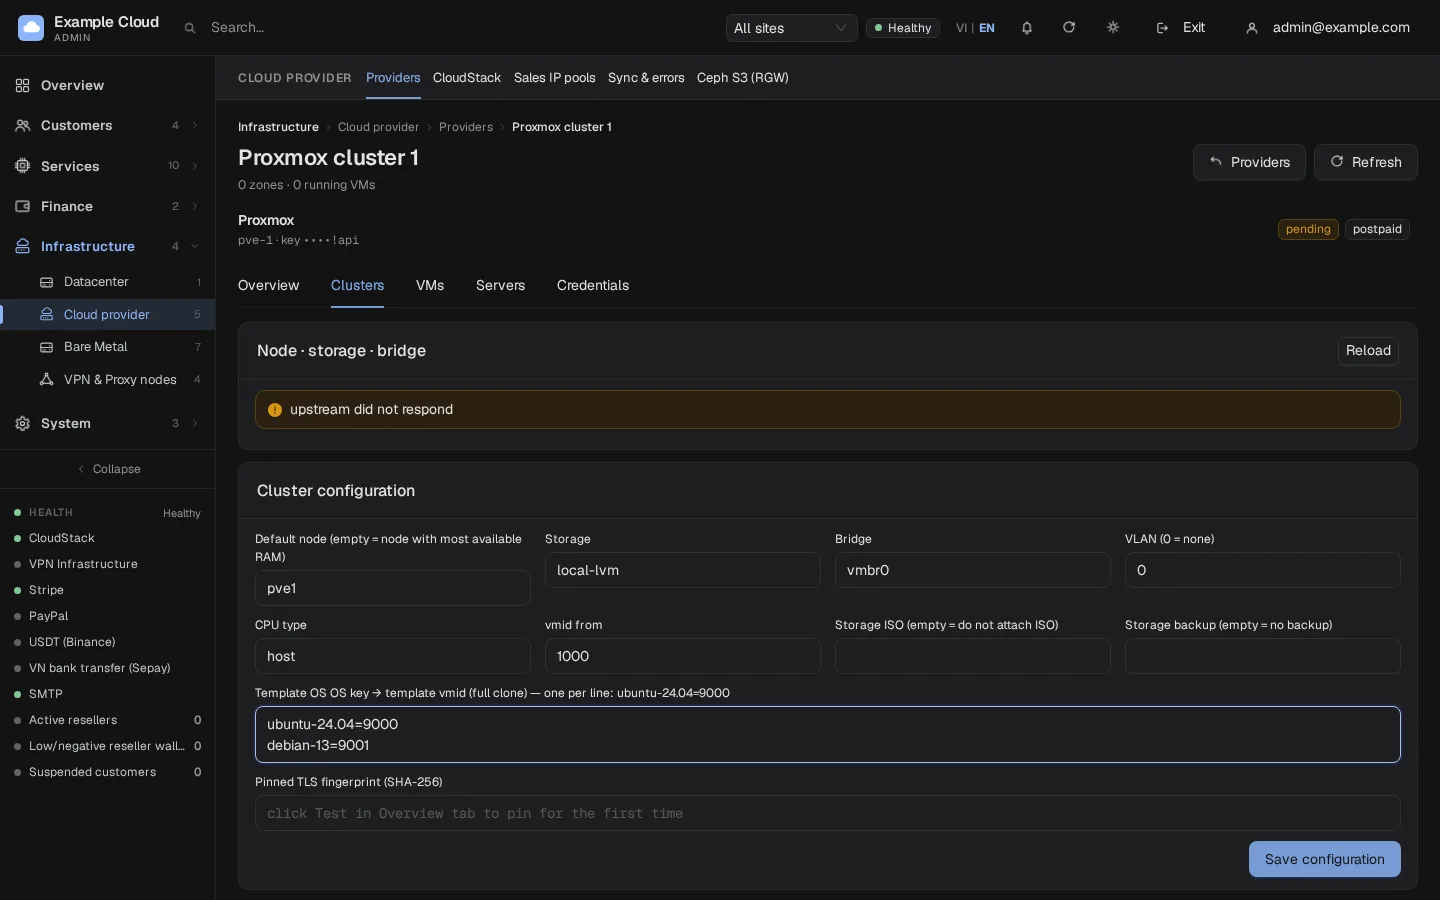
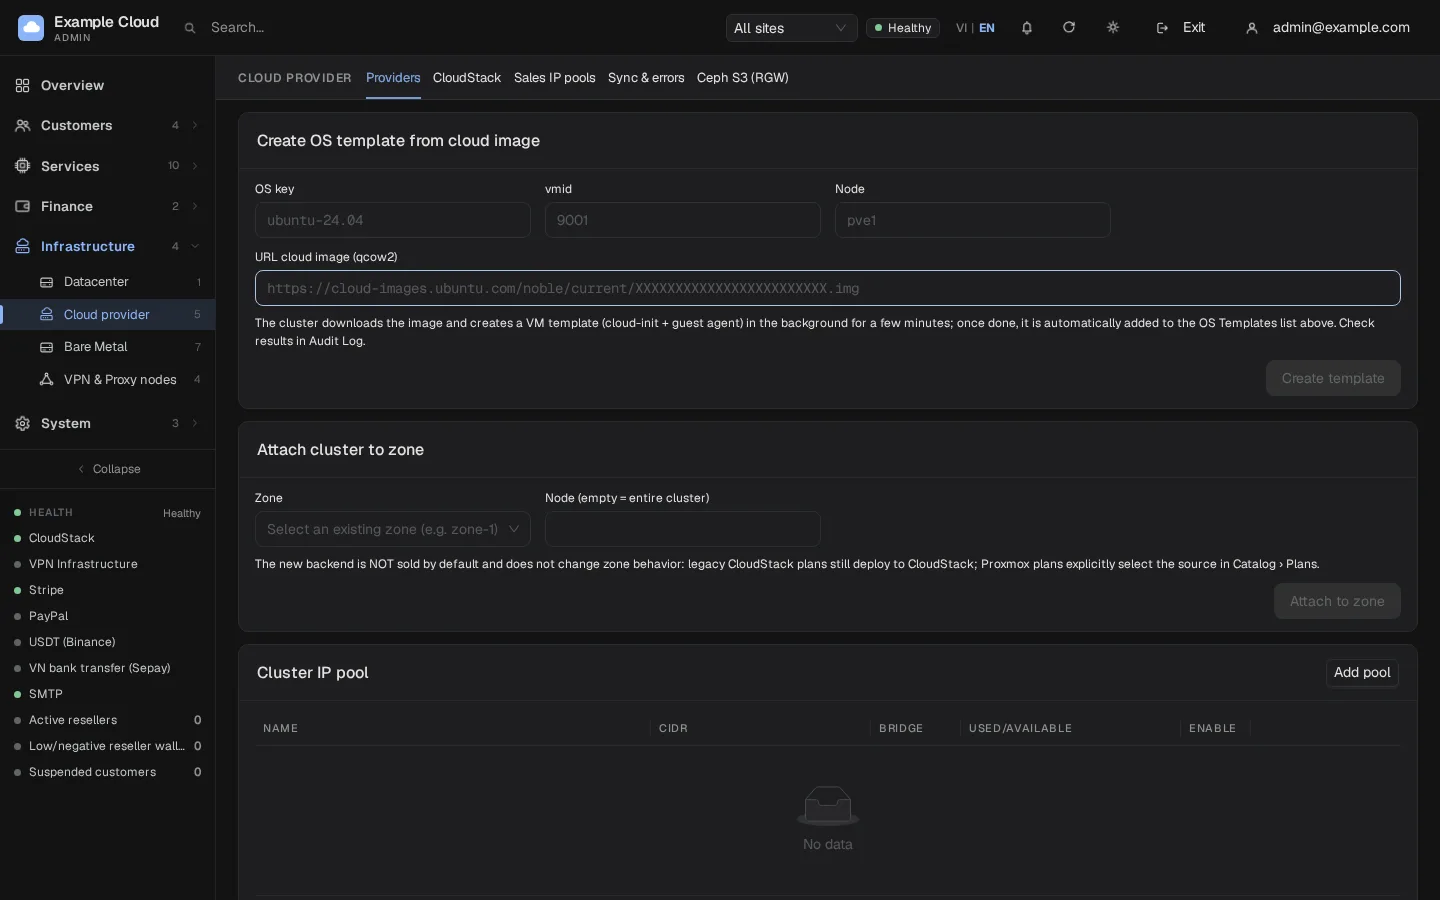
Optional: if you used Option B above, fill Create OS template from cloud image (OS key
ubuntu-24.04, vmid9000, nodepve1, the qcow2 image URL) and click Create template. It runs in the background for a few minutes; the result is in the Audit log.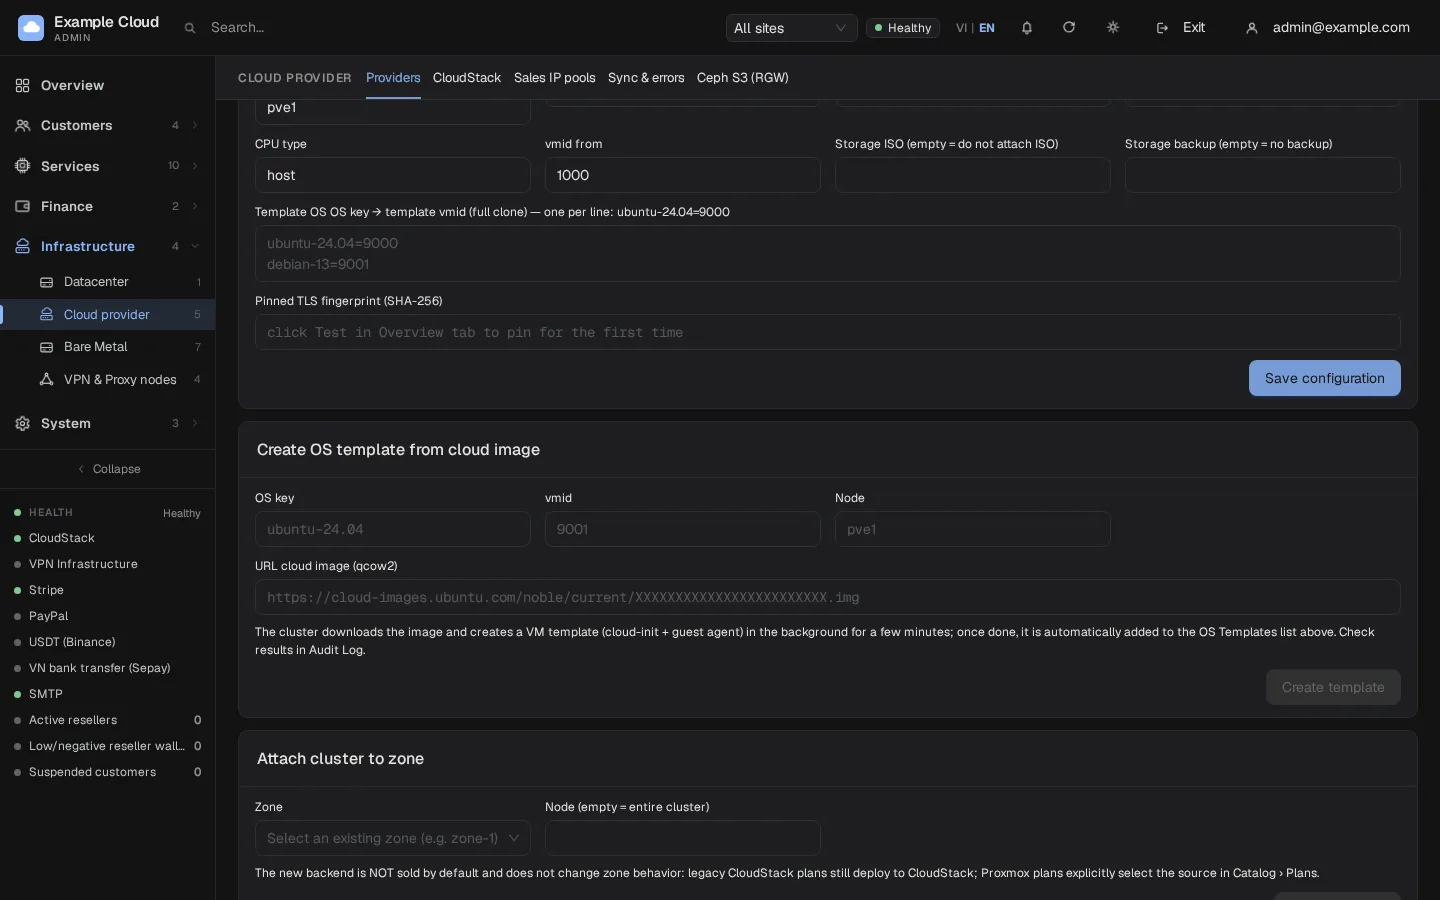
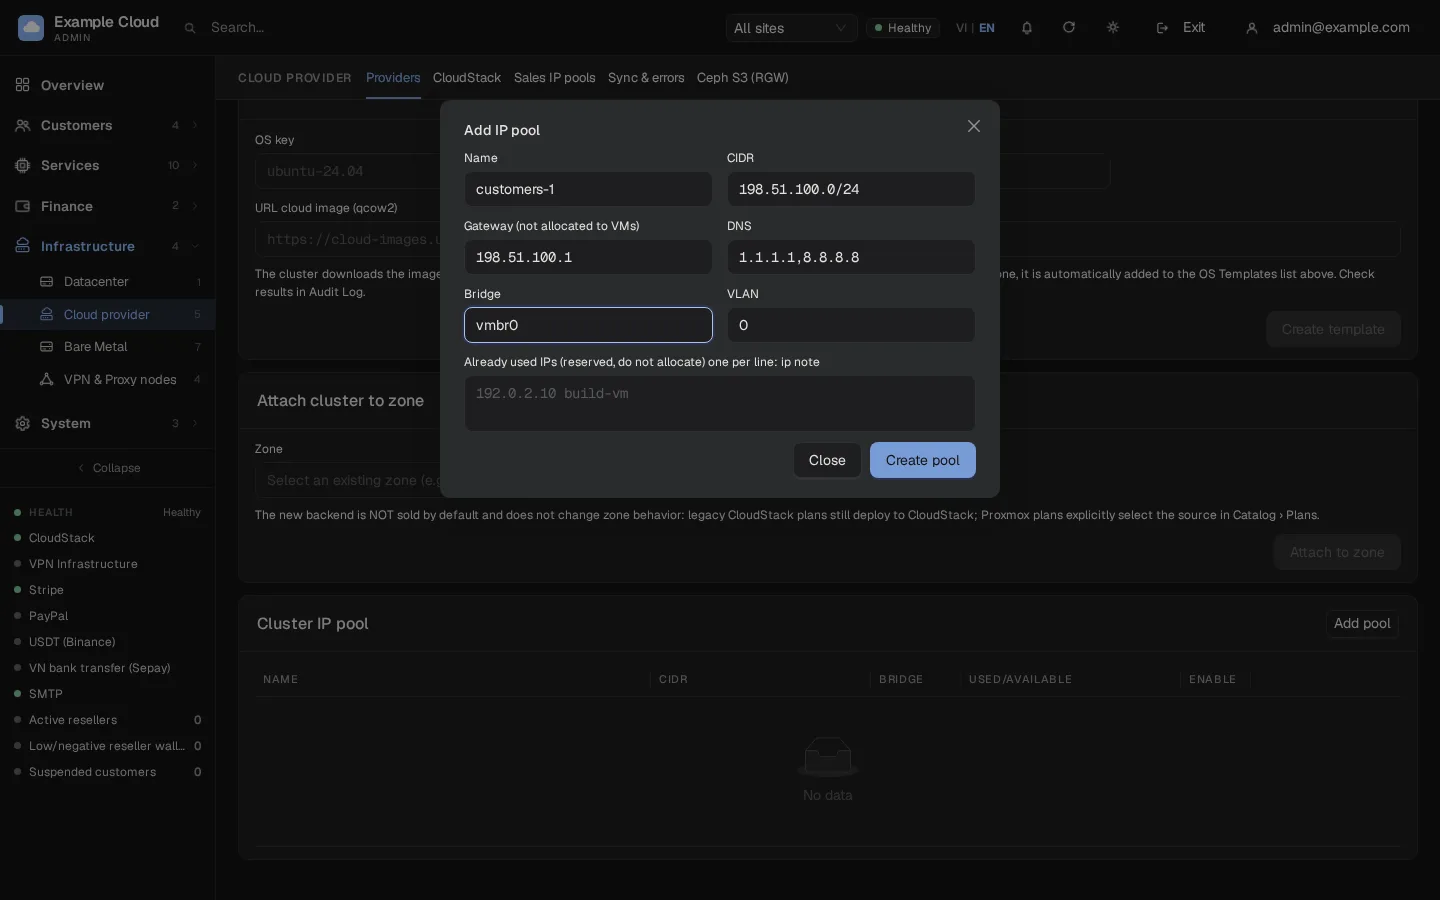
Click Add pool in Cluster IP pool and create the pool that VMs draw addresses from:
Field Example value Name customers-1CIDR 198.51.100.0/24Gateway 198.51.100.1(never given to a VM)DNS 1.1.1.1,8.8.8.8(1 to 4 IPv4 addresses)Bridge, VLAN vmbr0,0Already used IPs one per line, ip note, for example198.51.100.10 monitoringNexCMP never assigns the network address, the broadcast address, the gateway or a reserved address. Pools of the same cluster cannot overlap. A pool can be deleted only when none of its addresses is in use.
In Attach cluster to zone, choose the zone and, optionally, a node name, then click Attach to zone. The cluster joins the zone that already sells VMs, so one zone can have CloudStack and Proxmox together. The new source is not sold by default and does not change how existing plans behave.
Open Services › Virtual Machines › Plans & pricing and click Add plan. In Infrastructure source choose the Proxmox cluster, then set CPU, RAM, disk and price. A Proxmox plan needs no CloudStack offering. To sell the same configuration from both sources, use Clone on a plan and choose the other source. The plan's disk must be at least as large as the template's disk; Proxmox cannot shrink a disk.
Import a VM that already exists
Open the Servers tab to list the VMs on the cluster. Import assigns an existing VM to a customer account at no charge: nothing is billed for hours, power-off time or traffic. The customer can start, stop, reboot and open the console but cannot delete it; only an administrator can. NexCMP only reads from the cluster while importing.
The cluster must be attached to a zone with the node name of that VM (leave the node empty and imports report that the region is not set up).
To make a VM protected (stop, reboot, reinstall, snapshot restore, destroy and plan change are refused), import it from the command line with
--protect:bashsudo -u nexcmp /opt/nexcmp/bin/nexcmp px-import --provider pve-1 --server-ref pve1/101 --account-id 12 --hostname web-1 --protect
What is and is not supported on Proxmox
| Feature | Proxmox VE |
|---|---|
| Create, power on/off/reboot, delete | Yes |
| Resize CPU and RAM, grow the disk | Yes, but the VM is stopped, changed and started again (no live resize) |
| Snapshots | Yes, up to 5 per VM: create, list, restore, delete |
| Reinstall | Yes: the VM is rebuilt from the template and keeps its id, IP and settings, with a new password |
| Reset password | Yes, through the guest agent |
| Console | Yes, a browser console proxied by the panel |
| Metrics | Yes: CPU, memory, network and disk |
| ISO mount, backups, firewall, IPv6, port forwarding, change IP, extra volumes, Auto Scaling, DDoS Shield, VPC, bandwidth metering | Not available. The customer VM page hides what a source cannot do. |
Verify
- Test connection shows OK and the provider status is active.
- Clusters lists your nodes as online, with the storage and the bridge.
- Cluster IP pool shows the free, used and held counts.
- The OS key appears under the zone's templates in Services › Virtual Machines › Template after the cluster is attached.
- Order a test VM from a plan that uses the cluster. It should get an address from the pool, a root password and a working console; the pool shows one address used.
Limits and notes
Mixed-source zones
Since NexCMP 1.4.0, the public Cloud Server price list also works when CloudStack and Proxmox VE share a zone. Each plan uses its own Infrastructure source. After attaching a cluster, check the public price list and place a test order for each source.
- Several Proxmox clusters can be added. Each is one provider.
- A zone offers one default source; a plan with its own Infrastructure source is deployed to exactly that cluster, as long as the cluster is active and in the plan's zone.
- A cluster behind the same zone as CloudStack keeps its legacy plans on CloudStack. Test an order end to end before launch.
- The API token can only be replaced, never viewed. Replace it in the Credentials tab: create the new token in Proxmox first, enter it, run Test connection, then revoke the old token.
- The Test, Sync and cluster-info actions are limited to six calls per minute per administrator.
- NexCMP bills your customers; the hardware and licence cost of the cluster is yours.
Troubleshooting
| Symptom | Cause | Fix |
|---|---|---|
| Test: "Key rejected (wrong access key / secret, or revoked)" or HTTP 401/403 | Wrong token id or secret, or the ACL was given to the token only | Re-run the two pveum acl modify commands (user and token) and check the token id is user@realm!tokenid. |
| Test: "Could not connect to the provider" or "Timed out" | Firewall, wrong host or port | Check https://host:8006 from the panel server. |
| Test: "Invalid endpoint or not on the allowlist" | The endpoint has a path, user, query or is not HTTPS | Use exactly https://host:8006. |
| "cluster TLS certificate DOES NOT match pinned fingerprint" | The cluster certificate was replaced | Clear Pinned TLS fingerprint on the Clusters tab, save, run Test connection again. |
| Slug rejected | Not a-z, 0-9, hyphen, or not 2-32 characters | Use something like pve-1. |
| "Token id format: user@realm!tokenid and secret is required" | Token id or secret missing | Enter both; the secret is the UUID printed when the token was created. |
| "Invalid template line: …" | A line in Template OS is not key=vmid | Use letters, digits, ., _, - in the key and a vmid of at least 100. |
| "OS key: a-z 0-9 . _ - and vmid ≥ 100" | Invalid key or id in Create template | Fix the OS key and use a free vmid. |
| "vmid … already exists" when creating a template | The vmid is taken | Choose another id. |
| "url points to internal address" | The image URL is an internal IP | Use a public URL; names are resolved by Proxmox. |
| Template task fails on download | The storage local has no import content | pvesm set local --content …,import,snippets, then retry. A file name must end in .qcow2, .raw, .vmdk, .ova or .ovf. |
| "cluster has no online nodes" or "node … is not online" | The default node is down or misspelt | Fix Default node or leave it empty. |
| "image does not belong to cluster" | The plan's OS is not in Template OS | Add the key to the list and save. |
| Deploy waits, then fails on clone | The template VM is not on the chosen node | Create the template on that node, or set Default node to the node that has it. |
| Customer cannot log in as root | The image blocks root login | Rebuild the template as in Option A. |
| Reset password does nothing | No guest agent in the guest | Install and enable qemu-guest-agent in the template. |
| "Name, CIDR, and gateway are required" | Missing pool field | Fill all three. |
| Pool create: "overlaps with pool …", "gateway must be within range (not network/broadcast address)" or "cidr: network address must be …" | Overlapping pool, wrong gateway, or a CIDR that is not on a network boundary | Use a free range, a gateway inside it and a CIDR written as the network address (for example 198.51.100.0/24). |
| Import: "region is not set up" | The cluster is attached without the VM's node name | Attach the cluster to the zone with the node name. |