OS templates and ISOs
Where in the admin: Services › Virtual Machines › Template (
/vm/templates). Proxmox templates are listed per cluster on Infrastructure › Cloud provider › Providers › (cluster) › Clusters.
What it does
A template is the operating-system image a new VM starts from. NexCMP does not store images itself: it reads what CloudStack reports (ready, featured templates) or what you list for a Proxmox cluster, and lets you choose which ones are sold, with a customer-facing name, icon and login user. This page shows how to prepare images that work well with NexCMP: password login, live CPU and RAM scaling, a swap file, and a root disk that grows to the plan size.
Requirements
| Item | Requirement |
|---|---|
| CloudStack template builder | A Linux machine with libguestfs-tools (virt-customize, virt-sparsify, guestfish), qemu-utils, curl and about 5 GB of free disk. No KVM and no root are needed. Internet access for package installs (or build with --offline). |
| Where the builder is | It ships with every release in /opt/nexcmp/releases/<version>/share/templates/ on the panel server. You do not need to run it there: copy the folder to any Linux machine. |
| Web server | Any HTTP(S) server that CloudStack's secondary storage VM can reach, to publish the finished .qcow2 file. It does not have to be reachable from the Internet. |
| CloudStack | An account that may register templates, and the ID of your zone and of a matching OS type. See CloudStack. |
| Proxmox VE | Cloud-init template VMs with the QEMU guest agent, one per OS and per node. See Proxmox VE. |
| Depends on | CloudStack or Proxmox VE connected first. |
Prepare the infrastructure
CloudStack: build a template
Supported base images (the vendor image is downloaded and its checksum verified before anything is changed):
| Image | --distro | Login user |
|---|---|---|
| Ubuntu 22.04 | ubuntu-22.04 | ubuntu |
| Ubuntu 24.04 | ubuntu-24.04 | ubuntu |
| Debian 12 | debian-12 | debian |
| Rocky Linux 9 | rocky-9 | rocky |
More distributions: add a line to distros.conf (image URL, checksum file, family deb or rpm).
Copy the builder to a build machine and run it:
bashcp -r /opt/nexcmp/releases/<version>/share/templates ~/templates && cd ~/templates ./build-template.sh --distro ubuntu-24.04 --version v7 --work ./outAdd
--panel-url https://cloud.example.comto bake in an optional first-boot monitoring agent that enrolls with your panel (HTTPS only). Without it, no agent is added. Other options:--base <file>to use an image you downloaded,--offlineto skip package installs.The result is
out/ubuntu-24.04-v7.qcow2and its.sha256. The build ends by runningverify-image.sh, which inspects the finished image read-only and refuses a bad one (it is kept as.unverified). You can run it again any time:./verify-image.sh out/ubuntu-24.04-v7.qcow2 --no-agent.
What the builder puts in the image:
| Item | Why |
|---|---|
qemu-guest-agent | CloudStack can ask the VM about CPUs and IPs, and quiesce it for snapshots. |
cloud-init with the CloudStack data source, set_passwords on every boot, SSH password login | The generated password is fetched from the virtual router and Reset password works. |
| A udev rule for hot-added CPU and RAM | Hot-added vCPUs and RAM come online by themselves, so live scaling and Auto Scaling work. |
| A swap file service | Creates /swapfile of the smaller of 50% of RAM and 4 GiB after the disk has grown. touch /etc/cmp-swap.disabled turns it off. |
cloud-init growpart and resizefs | The small root disk grows to the plan's disk size on first boot. |
| Empty machine-id, no SSH host keys | Every VM gets its own identity. |
Name the template <OS> <version> <vN>
NexCMP switches Auto Scaling on for templates whose name ends in vN or vN.M with N of 6 or more (Ubuntu 24.04 v7, Rocky Linux 9 v7.1). The builder enforces this for --version. Register the template with exactly the printed name.
Publish the file and register it in CloudStack. Use the SHA-256 the build printed, and register only after the file is completely written:
bashcmk list ostypes keyword="Ubuntu 24.04" filter=id,description cmk register template name="Ubuntu 24.04 v7" displaytext="Ubuntu 24.04 v7" \ url=https://files.example.com/ubuntu-24.04-v7.qcow2 zoneid=<zone-id> format=QCOW2 hypervisor=KVM \ ostypeid=<os-type-id> passwordenabled=true sshkeyenabled=true isdynamicallyscalable=true \ requireshvm=true isextractable=false ispublic=true isfeatured=true \ checksum="{SHA-256}<sha256 of the file>" \ details[0].guest.cpu.mode=host-passthrough details[0].rootDiskController=osdefaultpasswordenabled=truelets CloudStack generate the VM password.isdynamicallyscalable=trueallows live scaling.host-passthroughis needed for current Rocky and Alma images to boot;osdefaultkeeps the disk controller portable.
Wait for the template to reach Download Complete / Ready.
The vendor image keeps its small virtual size (about 3.5 GiB for Ubuntu and Debian, 10 GiB for Rocky). Remember that a plan's disk cannot be smaller than the template's disk.
Proxmox VE: make a template
Build a cloud-init VM template per OS on every node you deploy to, with the guest agent installed and root login enabled, then register it as os-key=vmid. The full commands are in Proxmox VE. The CloudStack builder above is not for Proxmox: it configures cloud-init for the CloudStack data source.
ISOs
Customers mount their own ISOs through the Images module (CloudStack) or the Dedicated Server module. Those are separate from the OS templates on this page. See Modules and Dedicated servers.
Connect in NexCMP
Open Services › Virtual Machines › Template. Click Sync now or wait up to 15 minutes. The sync adds templates that are ready and featured in CloudStack.
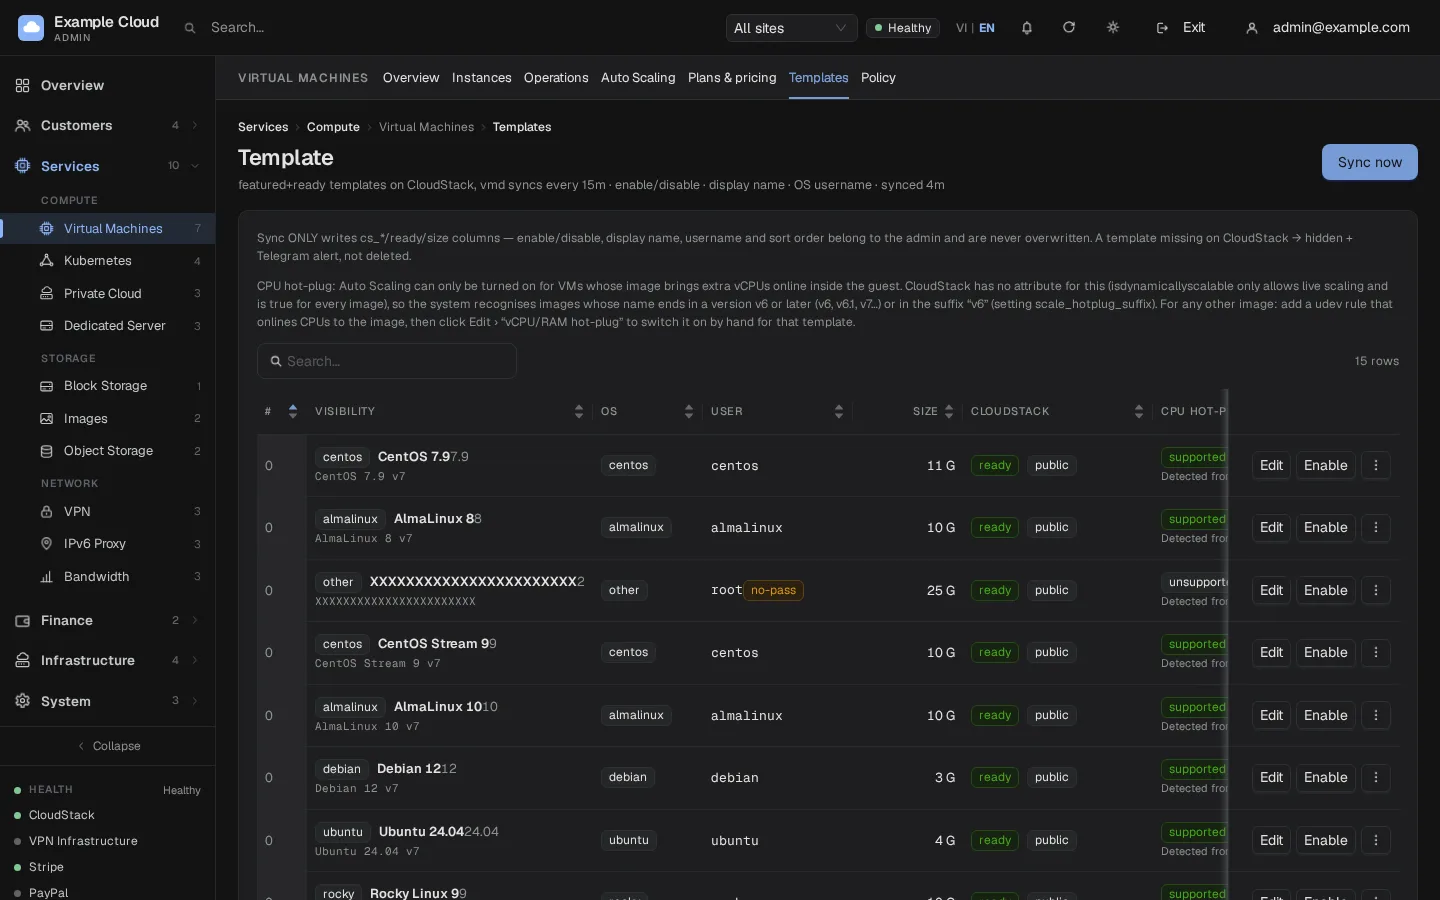
Click Edit on a new template and set what customers see:
Field Example value Display name for customers Ubuntu 24.04 LTSOS family ubuntu(icon and default user)Version 24.04Login username ubuntu(Windows:Administrator; other:root)Icon image URL, a path or a name Order 10Active On vCPU/RAM hot-plug (live scale) Auto by name (v6 or later), Yes or No (needs a restart) 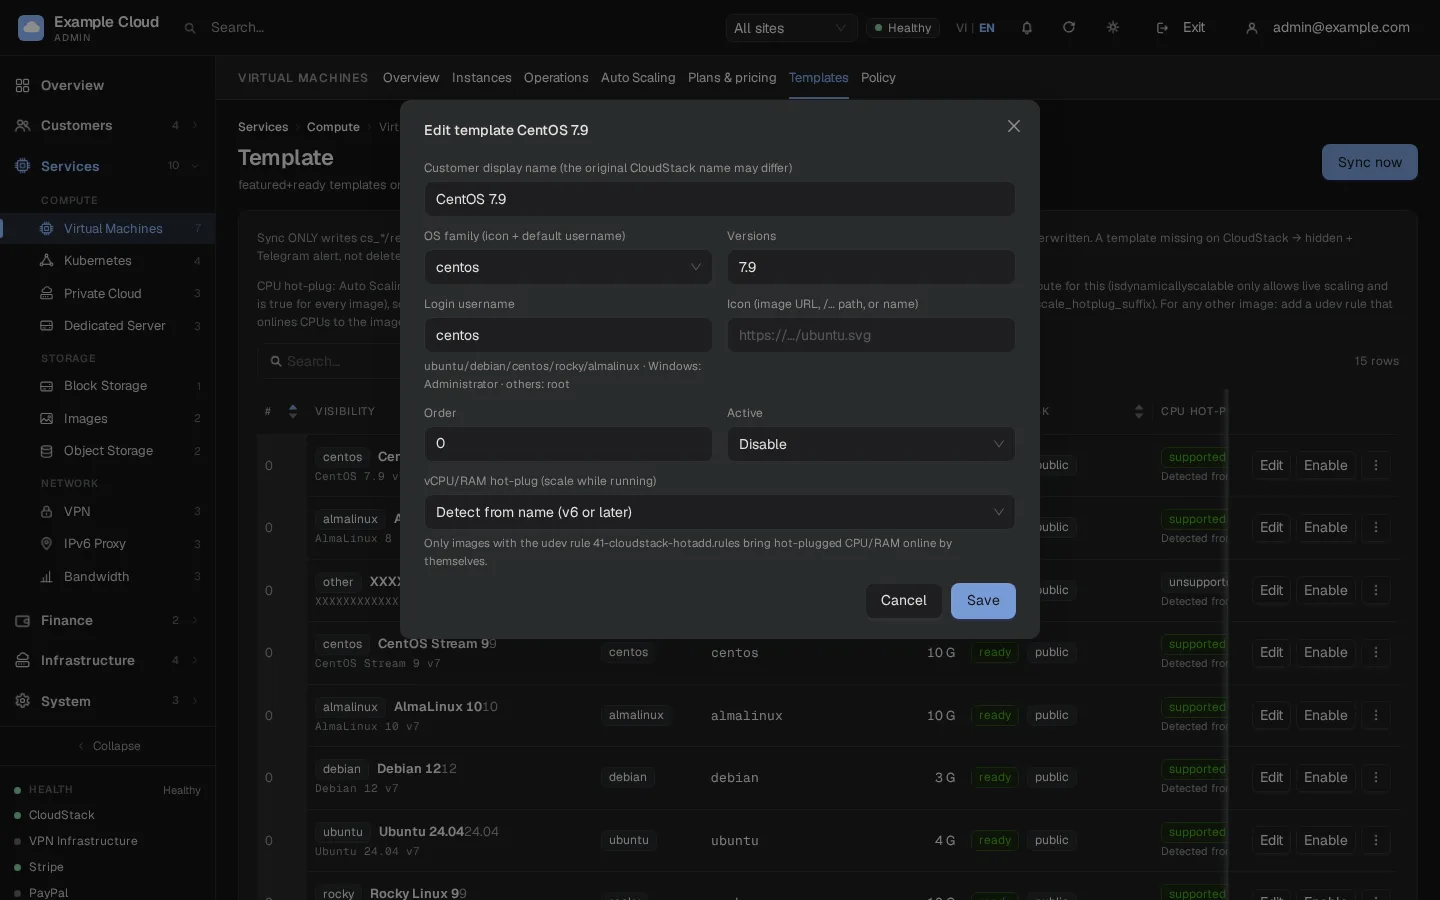
Switch the template on. A template that CloudStack no longer lists is hidden automatically (and you are alerted in Telegram if configured); it is never deleted from NexCMP.
Replace a template with a newer build
Use More › Replace with new version on the sold template. Pick the new, ready, currently disabled template. The sold entry then points at the new build and keeps its name, order and icon; the old one is disabled as a way back (to go back, use Replace on the new entry). Running VMs are not touched. If the new build is a different OS family, tick the confirmation first.
Verify
- The row shows ready and, for builds named
vNwith N of 6 or more, CPU hot-plug: supported. - Deploy one test VM from the template and check inside the VM:
- you can log in with the password shown in the portal;
df -h /shows the plan's disk size;- after a live scale (Change plan with no reboot),
nprocandfree -mgrow; swapon --showlists/swapfile(disks with less than swap plus 2 GiB free skip it);systemctl is-active qemu-guest-agentprintsactive.
- If you baked the agent in, the VM appears in the panel's monitored hosts a minute after the first boot. The VM needs a public IP of its own: the panel recognizes it by its public source IP.
Limits and notes
- The builder is Linux-only and builds Linux images. Other images (for example Windows) can be registered in CloudStack by other means; NexCMP lists what CloudStack reports.
- Only the amd64 agent is shipped; other architectures skip the agent install.
- The image is checked with
guestfishbut never booted by the builder. Always deploy one test VM before selling a new image. - Skip the agent on one VM with
touch /etc/cmp-agent.disabledbefore first boot. Remove it later withsystemctl disable --now cmp-agent cmp-agent-install; rm -rf /etc/cmp-agent /usr/local/bin/cmp-agent, then delete the agent in the admin console.
Troubleshooting
| Symptom | Cause | Fix |
|---|---|---|
virt-customize fails to download packages | The build machine has no outbound network | Fix DNS or proxy on that machine, or build with --offline on a base image that already has the packages. |
libguestfs: error: /usr/bin/supermin exited with error status 1 | The host kernel is not readable by the current user (Ubuntu) | sudo chmod +r /boot/vmlinuz*, or run the build as root. |
| Checksum differs, or the vendor image no longer exists | Vendors move their "latest" files | Download the image yourself, check it against the vendor's checksum file and pass it with --base. |
| Rocky: a newer XFS cannot be mounted | The host kernel is too old | Build on a machine with a recent kernel. |
--version must be v6 or higher | The name must be vN with N of 6 or more | Use --version v7. |
--panel-url must be a plain https:// URL | The agent is downloaded and run as root, so plain HTTP is refused | Use an https:// URL without spaces, quotes or a query string. |
| Template stays not ready | CloudStack has not finished downloading | Wait for Download Complete, check the secondary storage VM can reach the URL. |
| Row shows no-pass | The template was registered without passwordenabled=true | Register it again with that flag. |
| CPU hot-plug shows unsupported | The name does not end in vN (N of 6 or more) | Rename the template, or set vCPU/RAM hot-plug to Yes in Edit if the image has the udev rule. |
| "Empty template list" after the first connection | The sync has not run | Click Sync now (needs the worker running) or wait for the 15-minute cycle. |